OwOCR Setup Guide
A simple guide on how to quickly set up and use OwOCR, an optical character recognition program that can make reading Japanese text from visual novels much easier.
Note: OwOCR is now available as a standalone GUI application, but it is still available as a terminal tool via pip on all platforms. Alternatively, you can use GameSentenceMiner, which includes a fork of OwOCR as part of its all-in-one mining setup. Keep in mind that due to the GSM fork using an older version of OwOCR, there can be differences in the results and new features such as text reordering and furigana filtering may not be present.

Installation
Windows / macOS (Recommended)
- Download the binary from the releases page
- On Windows, extract the zip and double-click on
owocr.exe - On macOS, open the dmg, drag it to Applications, then grant permissions on first launch
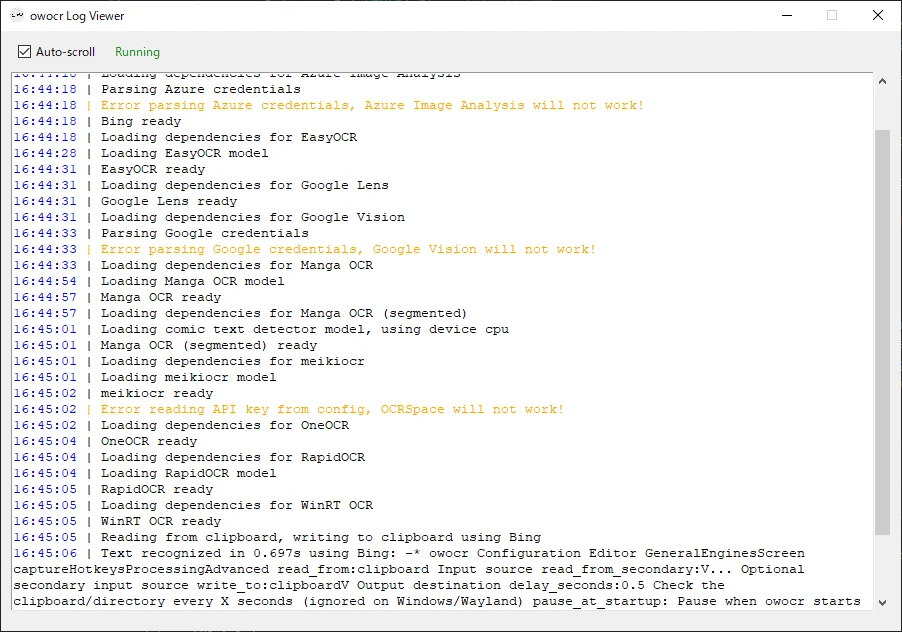
- Once you open the application, a log viewer and a tray application will appear, allowing you to easily change the configuration and monitor the application
Terminal / Python (All Platforms)
- Install Python (3.11, 3.12, or 3.13)
Warning: During installation, make sure to select "Add to Path". If you skip this step, OwOCR will not work.
- Open your command prompt/terminal and run:
pip install owocr - Install Google Lens for best OCR accuracy:
pip install "owocr[lens]"
Other providers:
- Bing: pre-installed → key:
b(close second best, recommended) - Apple Live Text: pre-installed → key:
d(macOS only, best local engine on Mac, vertical text support on Sonoma+) - Apple Vision: pre-installed → key:
a(macOS only, older version of Live Text) - OneOCR:
pip install "owocr[oneocr]"→ key:z(Windows 10/11, fast and accurate) - Manga OCR:
pip install "owocr[mangaocr]"→ key:m(ideal for small text areas) - EasyOCR:
pip install "owocr[easyocr]"→ key:e - RapidOCR:
pip install "owocr[rapidocr]"→ key:r - WinRT OCR:
pip install "owocr[winocr]"→ key:w(Windows 10/11) - meikiocr:
pip install "owocr[meikiocr]"→ key:k(fast local option, best for Linux, supports GPU acceleration withonnxruntime-gpu. Cannot process vertical text)
From the GitHub: If using an online engine like Lens, the developer recommends setting a secondary local engine with
-es:-es=oneocron Windows,-es=alivetexton macOS,-es=meikiocron Linux.
Getting Started
GUI (Recommended)
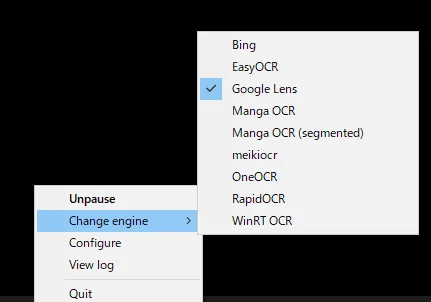
First, open OwOCR, and you'll see a log viewer window and tray icon appear. To get started with some basic configuration, right click on the tray icon and access the menu. From here you can change settings like the OCR engine and more.
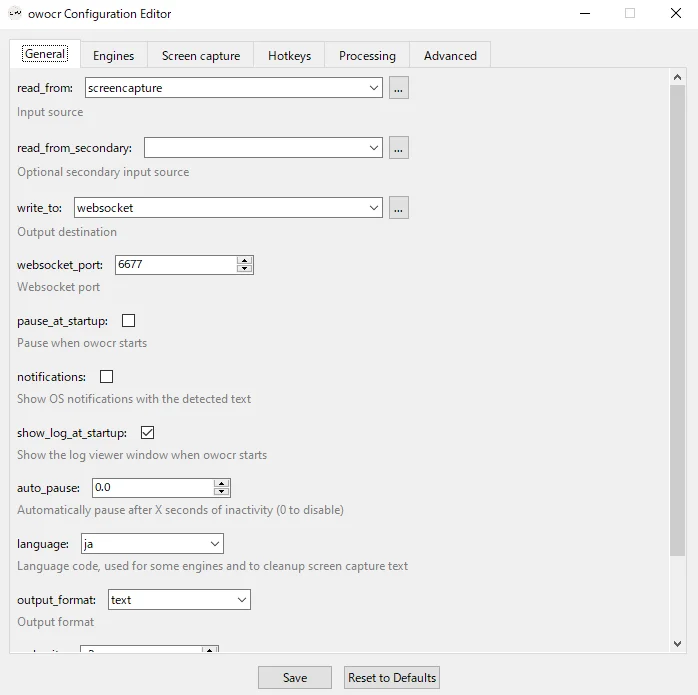
Click Configure from the tray menu to open the settings. Here are some suggested settings for use with visual novels:
Under the General tab:
- read_from:
screencapture - write_to:
websocket(see the Textractor Guide if you need help setting up a texthooker page for WebSocket output)
Under the Engines tab:
- engine:
Google Lensfor best accuracy oroneocron Windows for faster local processing, pick whichever suits your needs - engine_secondary:
oneocron Windows,alivetexton macOS,meikiocron Linux
The local engines listed above are also perfectly valid as your primary engine if you prefer faster processing and privacy. Only enable the engine(s) you actually use, as extra engines significantly increase startup time.
Under the Screen capture tab:
- screen_capture_area controls what OwOCR captures. By default it's set to automatic selection, which prompts you to select a capture area on startup. You can also set it to capture the entire screen, or set it to window, which will let you enter a window name to lock onto.
You can also quickly switch between engines at any time from the tray menu under Change engine.
To start and stop OCR, left click on the tray icon (Windows) or select Pause/Unpause from the tray menu.
Terminal
Tip: You can run
owocr_configfrom the terminal to open the same configuration editor shown above.
Screen Capture Mode
This is the easiest way to get started. OwOCR captures directly from your screen with a hotkey.
owocr -r=screencapture --engine=glens
This starts OwOCR with Google Lens and opens an area selector when triggered. The recognized text is copied to your clipboard for dictionary lookup.
Capture a specific window:
owocr -r=screencapture -sa=YourWindowTitle --engine=glens
Replace YourWindowTitle with part of your game's window title. OwOCR will capture the first window that matches.
Capture just part of a window:
owocr -r=screencapture -sa=YourWindowTitle -swa="" --engine=glens
Adding -swa="" opens a selector to choose a specific area within that window. Useful when you only want to OCR the text box.
Launcher Script (Recommended)
Create a batch file (e.g., run_owocr.bat) for easy one-click launching. This script lets you choose between screen capture and clipboard mode, pick your output destination, and optionally target a specific window from a list of open windows.
Warning: Don't name the file
owocr.bator it will call itself instead of the actual program.
@echo off
setlocal enabledelayedexpansion
set "OWOCR_CMD=owocr"
set "WEBSOCKET_PORT=6677"

echo === OwOCR Launcher ===
echo.
echo Choose input mode:
echo   1: Screen capture (auto-capture window/region)
echo   2: Clipboard (manual screenshots)
echo.
set /p "input_mode=Enter 1 or 2: "

echo.
echo Choose output mode:
echo   1: Clipboard (default)
echo   2: Websocket (for Agent/other tools)
echo.
set /p "output_mode=Enter 1 or 2: "

if "%output_mode%"=="2" (
    set "OUTPUT_ARGS=-w websocket -wp %WEBSOCKET_PORT%"
) else (
    set "OUTPUT_ARGS=-w clipboard"
)

if "%input_mode%"=="2" (
    echo.
    echo Launching in clipboard mode...
    %OWOCR_CMD% -r clipboard --engine glens -es oneocr %OUTPUT_ARGS%
    goto end
)

:: Screen capture mode
echo.
choice /C YN /M "Target a specific window"
if errorlevel 2 goto fullscreen

echo.
echo Available windows:
echo ---------------------------------
set i=0
for /f "delims=" %%A in ('powershell -NoProfile -Command ^
    "Get-Process | Where-Object { $_.MainWindowTitle -and $_.MainWindowTitle.Trim() } | ForEach-Object { $_.MainWindowTitle } | Sort-Object -Unique"') do (
    set /a i+=1
    set "win[!i!]=%%A"
    echo !i!: %%A
)
echo ---------------------------------

if %i%==0 (
    echo No windows found.
    goto fullscreen
)

set /p "choice=Enter number: "
if not defined win[%choice%] (
    echo Invalid selection.
    goto fullscreen
)

set "WINDOW=!win[%choice%]!"
echo.
echo Full title: !WINDOW!

:: Extract safe search term
for /f "delims=" %%S in ('powershell -NoProfile -Command ^
    "$t = '!WINDOW!'; $m = [regex]::Match($t, '^[^/:()]+'); if($m.Success -and $m.Value.Trim().Length -gt 3){$m.Value.Trim()}else{$t.Substring(0,[Math]::Min(20,$t.Length))}"') do set "SAFE_WINDOW=%%S"

echo Using search term: !SAFE_WINDOW!
echo.

echo Choose OCR mode:
echo   1: Pick region within window (recommended)
echo   2: Capture whole window
echo.
set /p "mode=Enter 1 or 2: "

if "%mode%"=="1" (
    echo.
    echo Launching with region picker...
    %OWOCR_CMD% -r screencapture --engine glens -es oneocr %OUTPUT_ARGS% -sa "!SAFE_WINDOW!" -swa ""
) else (
    echo.
    echo Launching for whole window capture...
    %OWOCR_CMD% -r screencapture --engine glens -es oneocr %OUTPUT_ARGS% -sa "!SAFE_WINDOW!" -swa "window"
)
goto end

:fullscreen
echo.
echo Starting full-screen mode...
%OWOCR_CMD% -r screencapture --engine glens -es oneocr %OUTPUT_ARGS%

:end
echo.
echo OwOCR exited with code: %ERRORLEVEL%
pause
Clipboard Mode
If you prefer using a screenshot tool like ShareX, OwOCR can monitor your clipboard instead:
owocr --engine=glens
Take a screenshot that copies to clipboard, and OwOCR will automatically process it and replace the clipboard contents with the recognized text.
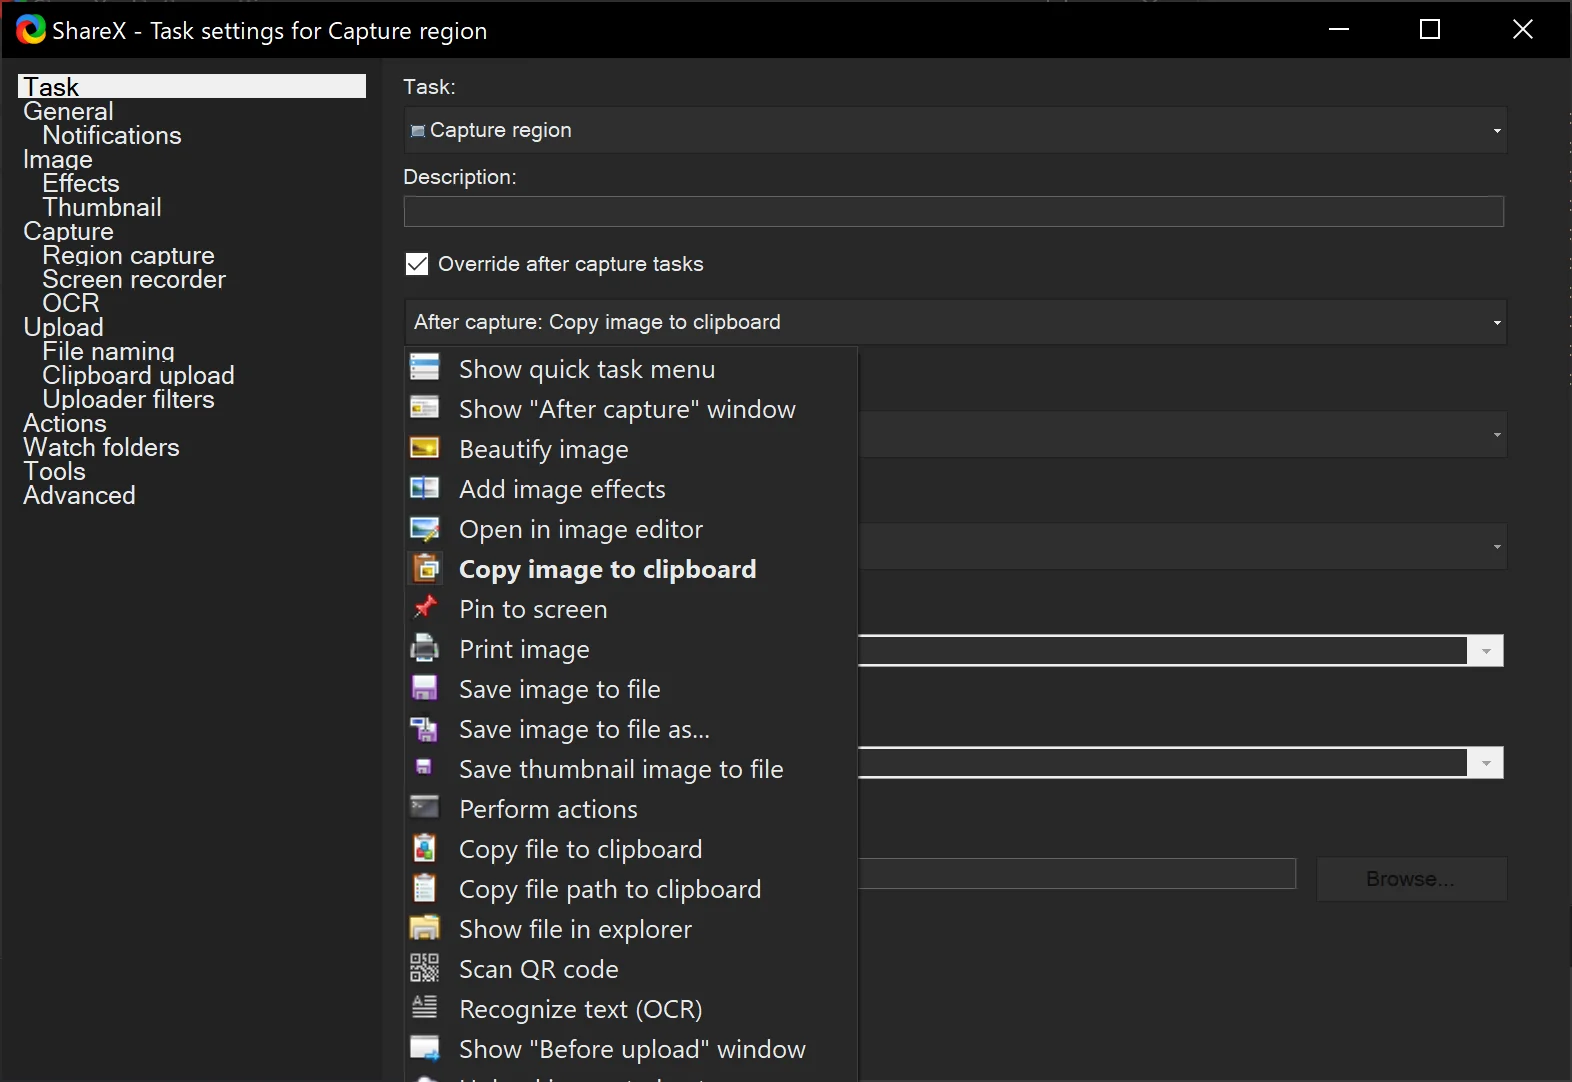
ShareX Configuration (Optional)
If you prefer clipboard mode with ShareX instead of OwOCR's built-in screen capture:
- Right-click the ShareX system tray icon → "Hotkey settings"
- Click "Add" to create a new hotkey
- Select Capture Region or Capture Region (Light)
- Set your preferred hotkey (avoid keys games use, like Shift)
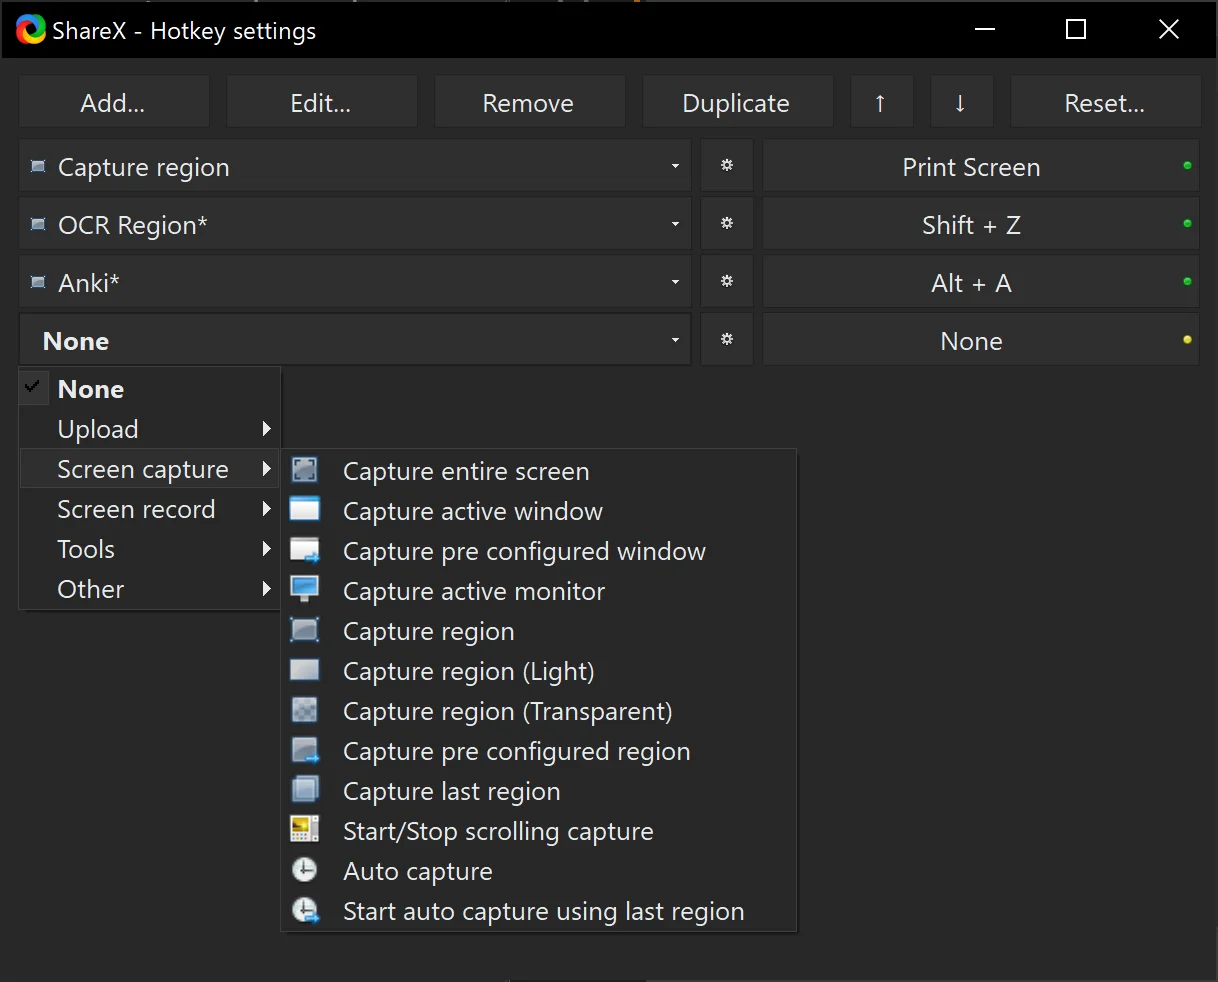
- Click the gear icon next to your hotkey
- Under "Task" settings, enable "Override after capture tasks"
- Select only "Copy image to clipboard" and disable everything else
Dictionary Integration
JL
JL is the recommended dictionary for OwOCR. It works with both clipboard and WebSocket input.
For the ShareX workflow (OCRing specific words for instant lookup), enable these settings:
- Preferences → Popup → Auto lookup the first term when it's copied from the clipboard
- Preferences → Popup → Auto lookup the first term when it's copied from a WebSocket
- Preferences → Popup → Don't auto look up the first term on text change if Main Window is not minimized
These settings let you OCR text and immediately see the definition without any extra clicks.
For a more seamless experience, consider using Tsukikage, which sends text to JL only when you hover over the corresponding region on your screen.
Yomitan
Enable clipboard monitor in Yomitan, then click the magnifying glass to access the search page.
Browser Extensions
For texthooker page integration:
WebSocket Support
OwOCR can send text via WebSocket instead of clipboard:
- Use
-w=websocketto write text to WebSocket - Default port is 7331 (configurable in config file)
Command Reference
Input/Output Options
| Option | Description |
|---|---|
-r, --read_from | Where to read images from: clipboard, websocket, unixsocket, screencapture, or a directory path |
-rs, --read_from_secondary | Optional secondary input source |
-w, --write_to | Where to save text: clipboard, websocket, or a file path |
-e, --engine | OCR engine: glens, bing, mangaocr, mangaocrs, gvision, avision, alivetext, azure, winrtocr, oneocr, easyocr, rapidocr, ocrspace, meikiocr |
-es, --engine_secondary | Secondary local engine for two-pass processing |
Screen Capture Options
| Option | Description |
|---|---|
-sa, --screen_capture_area | Target area: empty (selector), coordinates (x1,y1,x2,y2), screen_N, or window name |
-swa, --screen_capture_window_area | Subsection of window: empty (selector), coordinates, or window for whole window |
-sd, --screen_capture_delay_secs | Delay between screenshots. -1 to disable periodic capture |
-sw, --screen_capture_only_active_windows | Only capture when target window is active |
-sf, --screen_capture_frame_stabilization | Wait for stable text before processing. -1 waits for matching results, 0 disables |
-sl, --screen_capture_line_recovery | Recover missed lines from unstable frames |
-sr, --screen_capture_regex_filter | Regex to filter unwanted text (e.g., ▶|♥|・) |
-sc, --screen_capture_combo | Hotkey combo for taking screenshots (e.g., <ctrl>+<shift>+s) |
-scc, --coordinate_selector_combo | Hotkey combo for changing capture area |
Text Processing Options
| Option | Description |
|---|---|
-l, --language | Language code: ja (Japanese), zh (Chinese), ko (Korean), etc. |
-j, --join_lines | Remove spaces/separators between lines |
-jp, --join_paragraphs | Remove spaces/separators between paragraphs |
-ls, --line_separator | Custom line separator (supports \n) |
-ps, --paragraph_separator | Custom paragraph separator |
-rt, --reorder_text | Regroup and reorder text instead of using OCR engine order |
-f, --furigana_filter | Filter furigana from Japanese text (enabled by default for Japanese) |
-of, --output_format | Output format: text (default) or json (includes coordinates) |
Other Options
| Option | Description |
|---|---|
-p, --pause_at_startup | Start paused |
-d, --delete_images | Delete images after processing (when reading from directory) |
-n, --notifications | Show OS notification with detected text |
-a, --auto_pause | Auto-pause after N seconds of no recognition. 0 to disable |
-cp, --combo_pause | Hotkey combo for pause (e.g., <ctrl>+<shift>+p) |
-cs, --combo_engine_switch | Hotkey combo for switching engines |
-wp, --websocket_port | WebSocket port (default: 7331) |
-ds, --delay_seconds | Delay between clipboard/directory checks |
-v, --verbosity | Output verbosity: -2 (full text), -1 (timestamps only), 0 (errors only), or character limit |
Tips
- Google Lens offers the best accuracy in most cases. Local engines like OneOCR (Windows), Apple Live Text (macOS), and meikiocr (Linux) often work faster and respect your privacy
- Secondary engine: You can set up a secondary engine if you want to make use of a two-pass system. This means that only the changed areas get sent to the online engine, improving speed and accuracy
- Furigana is automatically filtered for Japanese text
- Avoid hotkey conflicts with game controls
- Mouse buttons work great as hotkeys if your mouse has extra buttons
- Test your setup on some Japanese text before starting a VN
- Config: Navigate to tray icon → Configure, or run
owocr_config. You can also edit it directly atC:\Users\YourUsername\.config\owocr_config.ini(Linux/macOS:~/.config/owocr_config.ini)
For more details, see the OwOCR GitHub page.